
Purchase bills
Record every supplier bill, so the GST you paid comes back as input tax credit and your stock stays right. Includes reading a bill from a photo, importing bills from a CSV file, and purchase orders to send suppliers.
Use Purchases for goods you buy to sell or to make things with (stock), from a supplier's tax invoice. Use Expenses for running costs that are not stock: rent, electricity, phone, software, travel, salary. Enter each bill in one place only. A bill entered in both is counted twice, and its GST is claimed twice in GSTR-3B.
#The purchase list
Open Purchases from the menu. The screen is called Purchase Bills, or Purchases when purchase orders are turned on. Then two buttons sit under the title: Purchase bills (the list on this page) and Purchase orders.
The buttons at the top right:
| Button | What it does |
|---|---|
| Import from image (OCR) | Reads a photo of a supplier's bill and fills the form for you. See Reading a bill from a photo. |
| CSV import / export | Brings in many bills at once from a spreadsheet, or saves all of them as one CSV. See Importing purchase bills from CSV. |
| Add Purchase | Opens a blank purchase bill. See Adding a purchase bill. |
The four totals
Total Purchases is the full value of the bills shown, with GST, cess and round-off. Owed to suppliers is what you still have to pay on those bills (see What you owe suppliers). GST (ITC Eligible) is the GST on those bills (CGST + SGST + IGST, without cess): the input tax credit they give you. Entries is how many bills are shown. All four follow the search and filters below them, so picking last year shows last year's totals.
Search and filters
- Search supplier, invoice...: type part of a supplier's name, their invoice number or their GSTIN.
- Year: the current financial year (April to March) to start. Pick one of the last five years, or All years.
- All bills / Unpaid / Partly paid / Paid: pick Unpaid / Partly paid to see only the bills you still have to pay.
- Cost centre: only when cost centres are turned on. All cost centres, No cost centre, or one branch, site or project.
- The red ✕ clears the search, the status and the cost centre. The year stays as it is.
Purchase Records
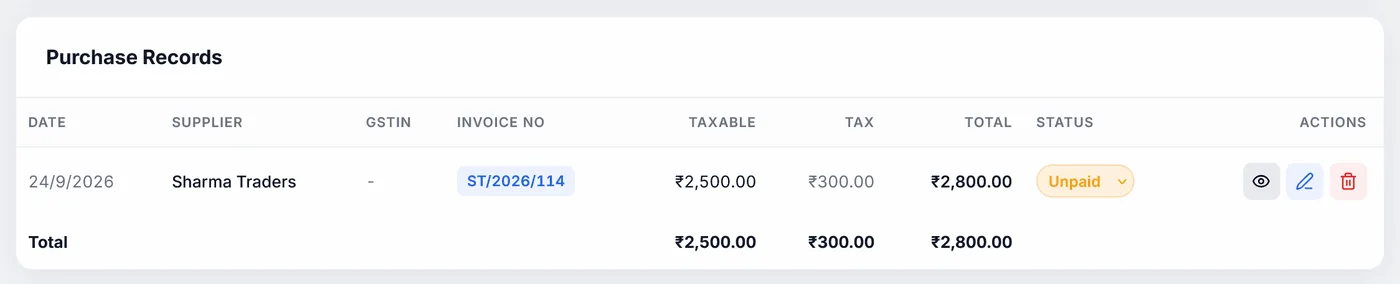
The table lists Date, Supplier, GSTIN, Invoice No, Taxable (value before GST), Tax (GST), Total, Balance due (what is still to pay, in red; a dash when nothing is), Status and Actions, newest first, with a Total row at the bottom. The Print / PDF, Excel and CSV buttons at the top of the table save the purchase register.
| On each row | What it does |
|---|---|
| Status dropdown | Unpaid, Partly paid or Paid. Picking Paid or Unpaid saves at once; Partly paid opens the payment window for the amount. See Marking a bill paid from the list. |
| Eye | Opens the bill to look at, without downloading anything. See Viewing a bill. |
| ₹ (green) | Records a payment to the supplier, and shows the payments already made. See Recording a payment to a supplier. |
| Pencil | Opens the bill in the form to change it. |
| Bin | Deletes the bill, after asking. Its quantities are taken back out of stock (see What saving does to your products). GST credit already claimed in a return you filed stays as filed. |
With no bills yet, the table says No purchase bills recorded yet. with an Add Purchase button. If you have bills but the filters hide them all, it says No purchases match your filters.: clear the search or pick All years.
A bill I entered is missing. Check the year: a bill dated March 2026 is in FY 2025-26, not the current year. Pick All years and search for the invoice number. Also check the business selected in the sidebar: each business sees only its own bills.
The same bills show under two businesses. They were saved before you kept businesses separate. See Not assigned to a business.
#Viewing a bill
Click the eye on a row. A window titled Purchase Bill · invoice number shows:
- the date, payment status, and Intrastate (CGST+SGST) or Interstate (IGST);
- the Supplier box: name, address and GSTIN;
- the items: #, Description, HSN, Qty, Rate, GST% and Amount (quantity × rate, plus GST);
- the totals: Taxable, then CGST and SGST (half each) or IGST, Cess and Round-off when there are any, and the TOTAL;
- Less: TDS and Paid to supplier when you keep back TDS, then Paid (the payments added up) and Balance due;
- Payments made: each payment's date, amount, mode and reference;
- the note, if the bill has one.
| Button | What it does |
|---|---|
| Close | Closes the window. Clicking outside it does the same. |
| Payments | Opens the payment window to record, change or delete a payment. See Recording a payment to a supplier. |
| Edit | Opens the bill in the form. |
| Download PDF | Saves a one-page A4 PURCHASE BILL PDF named Purchase-invoice no-date.pdf, with the supplier, the items, the tax split and the total, then the payments made, Paid and Balance due. Long item names wrap onto more lines instead of being cut. The coloured lines follow your PDF accent colour in print settings. |
This PDF is your own record of the bill. It is not a tax invoice: the supplier's bill is.
#Adding a purchase bill
Click Add Purchase. The Add Purchase Bill form opens (Edit Purchase Bill when you clicked a pencil). Copy the details from the supplier's bill.
| Field | What to put in |
|---|---|
| Date * | The date on the supplier's bill. Today to start. This decides which month's GSTR-3B the credit goes into. |
| Payment Status | Unpaid (to start) or Paid. Paid records one payment for the whole amount. To record what you actually paid (a part payment, UPI, cash), save the bill and use the green ₹ button in the list. Once a bill has payments, this box only shows its status. See Paying suppliers. |
| Supplier Name * | Required. Suppliers from your earlier bills are suggested as you type. Picking one fills in their GSTIN, address and Inter-state purchase from their last bill. |
| Supplier GSTIN | The supplier's 15-character GST number, from the top of their bill. Typing the full GSTIN ticks or unticks Inter-state purchase for you (see Suppliers in another state). Leave it blank for an unregistered supplier. |
| Supplier Address (optional) | Street, city, state. Printed on the purchase bill PDF. |
| Invoice Number * | Required. The supplier's invoice number exactly as printed, such as GS/2026/0457. GSTR-2B matching uses it, so do not shorten it. |
| Note (optional) | Anything for yourself, such as "paid by cheque 004512". |
| Cost centre | Only when cost centres are on. The branch, site or project this bill belongs to, or None. See Cost centres. |
| Inter-state purchase | Tick when the supplier charged IGST. See Suppliers in another state. |
Under the fields come the Items, the running totals and Apply round-off.
- SupplierType the supplier's name. If you have bought from them before, pick them from the list: GSTIN and address fill in.
- Bill detailsSet the Date and type the Invoice Number from their bill. Leave Payment Status on Unpaid and record the payment after saving (see how), or pick Paid if you paid it all and do not need the details.
- ItemsAdd one row for each line on their bill: name, HSN, quantity, rate before GST, and GST rate. See Items on the bill.
- Check the totalThe strip under the items shows Taxable, CGST and SGST (or IGST), Cess and Total. Compare them with the supplier's bill. If only the paise differ, tick Apply round-off.
- SaveClick Save (Update when editing). Cancel, or clicking outside the form, closes it without saving.
After saving, the message Purchase added — items synced to Products appears, the bill is at the top of the list, and the quantities are added to your product stock.
A bill made from a purchase order shows From purchase order PO number under the title. See Turning a purchase order into a bill.
"Supplier name is required" or "Invoice number is required": fill in that field. "Add at least one item with a quantity and rate": a bill needs at least one item with a name, a quantity and a rate above zero.
My total does not match the supplier's bill. Check that Rate is the price before GST (the taxable rate), that each Tax % is right, and that cess is entered. Then check Inter-state purchase: it changes the split, not the total. Paise differences are what round-off is for.
The wrong GSTIN came in when I picked a supplier. The suggestion uses their last bill. Type the correct GSTIN over it; it is kept.
"Failed to save purchase": the app could not reach its data. See Saving problems.
#TDS on a purchase bill
If you must deduct income-tax TDS when you pay this supplier (a contractor under 194C, a professional under 194J, rent under 194I...), record it on the bill. Under the totals strip, tick TDS deducted:
- SectionPick the section. Its usual rate fills in.
- Rate or amountCheck the Rate %: the TDS is worked out on the taxable value (before GST), and the amount box shows it as a hint. To use an exact figure instead, type it in the amount box.
- CheckThe strip shows Less TDS and Paid to supplier (the bill total less the TDS): that is what you pay the supplier. The bill's total itself does not change, and nor does the GST credit.
When you record payments on this bill, they are measured against Paid to supplier, not the total: paying that amount makes the bill Paid, and its Balance due is what is left of it.
The view and the PDF of the bill show the TDS and Paid to supplier under the total. Every bill with TDS is listed in Reports, TDS & TCS, totalled by section and quarter, for depositing the TDS and filing your Form 26Q. You need a TAN to deduct TDS; ask your CA whether a payment needs it.
#Items on the bill
Each row of Items is one line of the supplier's bill.
| Column | What to put in |
|---|---|
| Name | The item. As you type, your products and items from earlier bills are suggested (your Products list first). Picking one fills in its HSN, its purchase price as Rate, its Tax % and Cess %. Use the same name as in Products, so stock goes to the right product. |
| HSN | The HSN code (goods) or SAC code (services) printed on the supplier's bill. |
| Qty | How many. Decimals are fine: 2.5 kg, 0.75 m. |
| Rate | The price of one unit before GST, as on the supplier's bill. |
| Tax % | The GST rate: 0%, 0.1%, 0.25%, 3%, 5%, 12%, 18% (to start), 28% or 40%. For any other rate pick Other…: a box asks for a rate between 0 and 100 (up to two decimals), then Apply rate. |
| Cess % | Compensation cess, only for goods that carry it (tobacco, pan masala, aerated drinks, coal, some vehicles). 0 for everything else. |
| Bin | Removes the row. The last row cannot be removed. |
Add Item adds a new row and puts the cursor in its name, so you can keep typing: Tab to the button, Enter, and type the next item.
Clicking Qty, Rate or Cess % selects what is in it, so typing replaces it (you get 18, not 018).
If you pick a different item in the same row, its details replace the old item's. A value you typed yourself is kept.
The strip under the items adds up as you type: Taxable (quantity × rate for every row), CGST and SGST (half the GST each) or IGST for an inter-state bill, Cess when there is any, Round-off when ticked, and Total.
HSN is the code for the type of goods (SAC for services). CGST and SGST are the central and state halves of GST, charged when the supplier is in your state; IGST is the single tax charged when they are in another state. See the glossary.
#Round-off
Most suppliers round their bill total to the nearest rupee. If yours did, tick Apply round-off under the items, so your total matches theirs: ₹1,234.56 becomes ₹1,235 (round-off +₹0.44), ₹1,234.40 becomes ₹1,234 (round-off −₹0.40).
It is off to start, because many bills already match the items exactly. The round-off is kept separate: it changes the bill's total, not its GST, so your input tax credit stays exactly what the supplier charged. It shows on the view, the PDF and the purchase register.
An old bill with a round-off amount saved on it opens with the box already ticked.
#Suppliers in another state
When a supplier is in your state, their bill charges CGST + SGST. When they are in a different state, it charges IGST instead. Tick Inter-state purchase for an IGST bill, so the credit goes to IGST in GSTR-3B rather than CGST and SGST. Getting it wrong puts the credit in the wrong column.
You rarely need to tick it yourself:
- Typing the supplier's full GSTIN ticks or unticks it. The first two digits of a GSTIN are the state code (03 Punjab, 07 Delhi, 27 Maharashtra...), compared with the state of your business in Settings.
- Picking a supplier you have bought from before uses what their last bill had.
- Reading a bill photo ticks it when the bill shows IGST and no CGST.
You can still change it by hand, for the rare exception. Simply look at the supplier's bill: IGST printed means ticked; CGST and SGST printed means not ticked.
If the box does not tick itself when you type a GSTIN, your own state may be missing. Fill in State in Settings, Company Details. See also The wrong tax split.
#How the GST credit is used
Input tax credit (ITC) is the GST you paid on what you bought, which you subtract from the GST you collected on sales. The app adds up the GST on every purchase bill and every expense in the period, and puts it in Table 4 (Eligible ITC) of GSTR-3B: to IGST for an inter-state bill, otherwise half to CGST and half to SGST. Cess on purchase bills goes in as cess credit. The credit goes into the month of the bill's Date.
The purchase form has no switch for reverse charge, blocked credit or a separate place of supply. Every bill's GST is counted as credit. So:
- Check against GSTR-2B. Only credit your supplier has reported usually can be claimed. Import your GSTR-2B on the GST Returns screen and compare: see Checking your credit against GSTR-2B. Matching uses the supplier GSTIN and invoice number, so type them exactly.
- Credit you cannot claim (food and drinks, personal use, motor cars in most cases, a supplier who has not filed): leave it out when you file on the portal, or ask your CA. The app does not know which credit is blocked.
- Reverse charge (you pay the GST instead of the supplier, for example on goods transport or legal services): the app does not work this out on purchases. Ask your CA how to show it.
Purchase bills also feed the Income Tax screen (your purchases, without GST, are subtracted from sales). The Profit & Loss report on Reports uses sales and expenses only, not purchase bills.
#Paying suppliers
Each time you pay a supplier, record the payment on their bill: how much, when, and how (cash, UPI, bank transfer, cheque, card). You can pay a bill in parts, and record as many payments as you made. The app then shows what each bill, and each supplier, still needs to be paid.
Each bill has a status, shown in colour in the Status column of the list:
| Status | Means |
|---|---|
| Unpaid (amber) | No payment recorded yet. The whole amount is still to pay. |
| Partly paid (purple) | Some payments are recorded, but they add up to less than the bill. Balance due shows what is left. |
| Paid (green) | The payments add up to the bill (less any TDS you keep back). Nothing is due. |
You do not set the status by hand: it follows the payments. Record a payment and it changes; delete one and it changes back.
The status does not change the GST credit: credit depends on the bill, not on whether you have paid it yet. (By law you must pay the supplier within 180 days to keep the credit.)
A bill you marked Paid in an older version has no payments on it. It stays Paid and owes nothing; you do not need to do anything. A bill marked Partial stays Partly paid, but the app does not know how much was paid, so its Balance due shows the whole amount until you record the payments you made.
#Recording a payment to a supplier
In Purchase Records, find the bill and click the green ₹ button under Actions (or open the bill with the eye and click Payments). The window Record payment to supplier opens. At the top it shows the bill number and supplier, the Total, Less TDS if you keep back TDS, what is Paid so far and the Balance still to pay.
- Amount paidIt starts at the balance still to pay. Leave it to pay the bill off, or type what you actually paid, such as 5000.
- Payment dateToday to start. Change it to the day the money left you.
- Payment modeCash, UPI, Bank transfer, Cheque, Card or Other.
- Reference / cheque no.Optional: the UTR or UPI reference from your bank, or the cheque number.
- NoteOptional, anything you want to remember.
- SaveClick Record Payment. The message says how much was recorded and what is left, for example "Payment of ₹5,000.00 recorded · ₹6,800.00 left to pay".
| Field | Details |
|---|---|
| Amount paid * | More than 0, paise allowed. It cannot be more than the balance still to pay (a rupee over is allowed for rounding). |
| Payment date * | The day you paid. |
| Payment mode | Bank transfer to start. Pick Cash for cash: it then shows in the Cash book too. |
| Reference / cheque no. | Up to 60 letters. |
| Note (optional) | Up to 300 letters. |
After saving, the list shows the new Balance due and status straight away.
"That is more than the ₹... still to pay on this bill": the amount is more than the balance. Check the amount, or the payments already recorded (they are listed under Payment History in the same window). If you really paid the supplier more, the extra is an advance against their next bill: record only the bill's balance here and note the rest.
"Enter an amount more than 0" or "Enter the payment date": fill in that box.
"Could not save the payment. Try again.": the app could not reach its data. See Saving problems.
#Part payments
Pay a bill in as many parts as you like. Each part is one payment. For example, a bill of ₹11,800:
- First partClick ₹, type 5000, pick UPI, add the UPI reference and click Record Payment. The bill is now Partly paid and its Balance due is ₹6,800.
- The restLater, click ₹ again. The amount already says 6800. Pick Cash and click Record Payment. The bill is now Paid, and the ₹6,800 shows in the Cash book as money out.
Payments made to a supplier in one go for several bills: record one payment on each bill, for the part of the money that went to it.
#Payment history: changing or deleting a payment
Every payment on a bill is listed under Payment History in the payment window, oldest first: date, amount, mode, and the reference and note. The status of the bill is under the list. The same payments show in the bill's view (eye) and on its PDF, under Payments made.
- Change a payment: click its pencil. The boxes above fill with that payment and the title becomes Edit payment. Change what you need and click Save payment, or Cancel edit to leave it as it was.
- Delete a payment: click its red bin. The app asks first, saying the amount and date. Click Delete payment. The bill goes back to Partly paid or Unpaid, and a cash payment leaves the Cash book.
#Marking a bill paid from the list
The Status dropdown on each row is a shortcut:
- Paid records one payment for the whole balance, dated today, mode Other and noted "Marked paid", and says Marked paid. Use it when you do not need the details. Mode Other is not counted as cash, so it does not show in the Cash book.
- Unpaid takes back that "Marked paid" payment. Payments you recorded yourself stay: the bill then stays Partly paid and the message says so; delete them from the ₹ window if they were wrong.
- Partly paid opens the payment window, because a part payment needs its amount.
Choosing Paid in the bill form does the same as choosing it here.
#What you owe suppliers
Four places show what is still to pay:
- The Owed to suppliers card above the list: the balance due on all the bills shown (it follows the year, search and filters; pick All years for everything).
- The Balance due column, with its total at the bottom. Pick Unpaid / Partly paid in the filters to see only those bills.
- The purchase register (Print / PDF, Excel, CSV), which has Paid and Balance due columns. See For your accountant.
- Reports, Party Outstanding with You owe suppliers: one row per supplier, month by month, like Tally.
The balance of a bill is its total, less TDS you keep back, less the payments recorded. A bill marked Paid before payments could be recorded owes nothing.
#Cash payments and the Cash book
A payment with mode Cash shows in the Cash book by itself, as money out, labelled Purchase bill number payment, with the supplier's name and the reference. It is counted once. Do not also add it in the Cash book.
To change or delete it, click its label in the Cash book (it opens Purchases), then use the ₹ button on the bill. The Cash book follows.
If you added supplier cash payments to the Cash book by hand before this version, and now also record them on the bill, delete your own Cash book entry so the money is not counted twice.
UPI, bank transfer, cheque, card and Other payments are not cash, so they do not show in the Cash book.
#What saving does to your products
Each item on the bill is matched to your products by name (capitals do not matter):
- A product you already have: its stock goes up by the quantity, and its purchase price becomes this bill's rate. Its selling price is not touched. Its HSN, GST rate and cess are filled in from the bill only if the product had none.
- A new item: it is added to your products, with the rate as both purchase and selling price, unit Nos (or the unit from the purchase order), and the quantity as its stock. Check its selling price afterwards in Products, or you will sell at cost.
- Editing a bill: only the difference is added. Change 10 to 12 and stock goes up by 2; remove a row and its quantity is taken back out.
- Deleting a bill: its quantities are taken back out of stock.
Stock can go below zero (if you sold before you entered the purchase); it is not stopped at zero.
A second product appeared with a slightly different name ("Pen drive 32GB" and "Pendrive 32 GB"). The bill's name did not match. Pick the item from the suggestions when typing a bill. To fix it, edit the bill to use the right name (the stock moves back), then delete the extra product.
"Purchase saved, but updating stock in Products failed": the bill is saved; check the stock of its items in Products and correct it there.
#Reading a bill from a photo
Instead of typing a long bill, let the app read it from a photo or scan. Click Import from image (OCR). The window Import from bill image (OCR) opens.
- Choose the pictureClick the dashed box, or drag a photo or scan of the bill onto it: PNG, JPG or WebP, up to 8 MB. PDFs are not accepted; take a screenshot of the page instead. A preview appears.
- Read itClick Extract fields. Reading image… shows a percentage. It takes a few seconds, longer on an older computer.
- Check everythingThe Extracted fields panel appears on the right. Correct anything it read wrong, and add or remove item rows. See Checking what was read.
- Use itClick Use these values. The Add Purchase Bill form opens with it all filled in.
- Check once more and saveCompare the form's total with the bill, fix any rate or tax, and click Save.
Everything is read on your own computer, in English, with no internet needed and nothing uploaded anywhere.
For best results: a sharp, straight, well-lit photo of a printed bill, taken from above, with the whole bill in the frame and nothing else. Handwritten bills, crumpled paper, shadows and photos at an angle read badly.
"Please upload an image (PNG, JPG, WebP).": you chose a PDF or another file. "Image is over 8MB": take a smaller photo, or crop it. "OCR failed: ...": the message ends with a hint; see Reading a bill photo failed. If a bill will not read well, type it in with Add Purchase: suggestions make it quick for suppliers and items you have used before.
#Checking what was read
The Extracted fields panel shows what the app found. Every box can be changed.
| Field | What to check |
|---|---|
| Supplier | Read from the capital-letter line above their GSTIN. Often needs correcting. |
| GSTIN | The first GSTIN on the bill. If the bill shows your GSTIN before the supplier's, replace it with theirs. |
| Invoice No. | The number after "Invoice", "Bill" or "No.". |
| Date | Read day first, as on Indian bills (03/04/2026 is 3 April). |
| Grand total | The amount after "Grand Total", "Amount Payable", "Total" or "Net Amount". Used only when no item rows are found. |
Tax breakdown, when found, lists the Taxable value, CGST, SGST / UTGST, IGST, Cess and Round-off printed on the bill, for you to compare. They are not copied into the form: the form works its own figures out from the items.
Line items shows each row it read, with the number found in brackets. Each row has the name, HSN/SAC, Qty, Rate ₹, GST% and Amount ₹, and a bin to remove it. Add row adds an empty one. A row that matches one of your saved products shows Matched saved product: name (with a percentage of how close the names are), and takes that product's GST rate and, if the bill had none, its HSN.
Check each row against the bill. The commonest mistakes: the Rate is really the line amount, the quantity was missed (it then shows 1), or a total line was read as an item. The Amount is only for comparing; the form uses quantity × rate.
Raw OCR text (click to open) shows everything the app read, if you want to copy a figure from it.
Use these values shows how many rows will go into the form. In the form, items come in with cess 0, so add cess yourself if the bill has it. A row where no GST % was found comes in at 0%: set its real Tax %. If no rows were found but a total was, one row named From OCR — split into real items holds the total: replace it with the real items and their GST rates before saving. Inter-state purchase is ticked when the bill showed IGST and no CGST.
#For your accountant
The Print / PDF, Excel and CSV buttons at the top of Purchase Records save the Purchase register: the bills shown, after the search, year, status and cost centre filters, oldest first, with a Total row. Your business name is at the top.
Columns: Date, Supplier, GSTIN, Invoice No, Taxable Amount, CGST, SGST, IGST, Cess, Inter-state (Y or N), Round-off, Total, Paid (payments to the supplier), Balance due, Status and Note.
- Print / PDF opens the register on its own page in landscape. Choose your printer, or Save as PDF. If nothing opens, allow pop-ups for the app (the message "Allow pop-ups for this page to print the report" appears).
- Excel downloads an
.xlsxfile, with numbers as numbers. - CSV downloads the same as a CSV file.
For one quarter, pick the year and give your CA the file; they can filter the dates. The register has one row per bill. To get one row per item (and a file you can import back), use Export all as CSV in CSV import / export.
#Importing purchase bills from CSV
Use this to bring in many bills at once: from another billing program, from Tally, or a sheet your accountant keeps. Click CSV import / export at the top of Purchases. The window Purchase bills: CSV import / export opens.
| Button | What it does |
|---|---|
| Template | Downloads Purchase-import-template.csv: the right columns and one example bill. |
| Export all as CSV | Downloads every purchase bill of this business as Purchase-bills-date.csv, one row per item, in the same columns. Good for a backup, or to move bills to another business. |
| Choose CSV file | Reads your file and shows what will happen. Nothing is saved yet. |
| Import | Saves the bills that are ready. The button shows how many. |
| Close | Closes without importing. |
- Start from the templateClick Template. Open it in Excel or Google Sheets, delete the example row, and fill in your bills. Save it as CSV (in Excel: File → Save As → CSV (Comma delimited)).
- Choose the fileClick Choose CSV file. A box shows the file name, how many bills are ready, how many are already there (skipped), and every problem, row by row (a bad date, a missing rate, no item name).
- Fix problemsBills with problems are not imported. Fix them in the file, save it, and choose it again.
- ImportClick Import. A message says how many were imported, how many skipped, and how many had errors.
The columns
One row per item. Rows with the same supplier and invoice number make one bill.
| Column | What to know |
|---|---|
| Invoice Number | Required. The supplier's bill number. |
| Invoice Date | Required. YYYY-MM-DD (2026-10-03) or DD-MM-YYYY (03-10-2026). |
| Supplier Name, Supplier GSTIN | At least one of the two. A bill with only a GSTIN uses it as the name. |
| Supplier Address | Optional. |
| Item Name | Required on every row. |
| HSN/SAC | Optional. |
| Quantity | 1 if blank. |
| Rate | Required. Per unit, before GST. |
| GST %, Cess % | 0 if blank. GST up to 100. |
| Inter-state | Yes or No. If blank, it is worked out from the supplier's GSTIN and your state. |
| Payment Status | Unpaid, Partial or Paid. Unpaid if blank. |
| Note | Optional. |
Other common headings are understood too: Bill No, Vendor, Party Name, GSTIN, Item, Particulars, HSN, Qty, Price, Tax %, Remarks and so on, so a file from another program often works as it is.
A bill already entered (same supplier and invoice number, matched by GSTIN or by name) is skipped, never changed. Imported bills have no round-off. Quantities are added to product stock and new items become products, as when you type a bill in (see What saving does to your products).
"The dates are month first": your Excel wrote dates as MM/DD/YYYY. Change the date column to DD-MM-YYYY or YYYY-MM-DD. A yellow line saying Dates are read day first is a reminder to check one example date.
"The file has no rows under the header", or nothing is read: the file is not a real CSV, or the headings are not in the first row. See A CSV import did not work.
A bill was skipped that I wanted. One with the same supplier and invoice number is already there. Delete it first if you want to bring it in again.
#Purchase orders
A purchase order (PO) is what you send a supplier before the goods come: what you want, how many, at what rate. It is not a bill, so it changes neither your stock nor your GST returns. When the goods come, you turn it into a purchase bill in one click.
Turn it on in Settings, Features: tick Purchase orders under Purchases screen, and save. It is on to start if you picked Wholesale / trading or Manufacturing as your business type. Purchases then has two buttons under the title, Purchase bills and Purchase orders. On the purchase orders tab, the top-right button is New purchase order.
- Make oneClick New purchase order, fill in the supplier and items, and Save. See The purchase order form.
- Send itClick the eye to view it, then WhatsApp, Email, Print or Download PDF. See Viewing and sending a purchase order.
- When the goods comeClick Convert to purchase bill, type the supplier's bill number, change any quantity to what actually came, and Save. See Turning a purchase order into a bill.
#The purchase order list
Search by PO number, supplier or GSTIN in Search PO number, supplier..., and filter by status with All statuses. The red ✕ clears both.
The Purchase orders table lists PO number, Date, Supplier, Expected (delivery date), Total (with GST) and Status. The actions on each row:
| Button | What it does | Shown for |
|---|---|---|
| Eye | View the order | Every order |
| Pencil | Edit the order | Open orders only |
| Green page | Convert to purchase bill | Open and Partly received |
| ⋯ menu | Duplicate, Print, Download PDF, WhatsApp, Email, Cancel order | Received and Cancelled orders show only Duplicate |
With no orders yet, the list says No purchase orders yet. with a New purchase order button.
#Purchase order status
The status is worked out from the purchase bills made from the order; you only set Cancelled yourself.
| Status | Means |
|---|---|
| Open | No bill saved from it yet. You can edit it. |
| Partly received | Bills saved from it have less than was ordered. Convert to purchase bill again fills in only what is still to come. |
| Received | Bills saved from it cover every item. |
| Cancelled | You cancelled it with Cancel order in the row's ⋯ menu. It keeps its number. |
Received and cancelled orders can only be viewed and duplicated (Duplicate starts a new PO with the same supplier, items and notes, and a new number). Items are matched between the order and its bills by name, so keep the item names the same on the bill.
Cancelling: Cancel order asks first. Cancel order again confirms, Keep it leaves it. Bills already saved from it stay as they are. A cancelled order cannot be made Open again; duplicate it instead.
#The purchase order form
New purchase order opens New purchase order (Edit purchase order from the pencil). It is the purchase bill form with a few changes:
| Field | What to put in |
|---|---|
| PO date * | The date of the order. Today to start. |
| Expected delivery | Optional. When you want the goods. Printed on the PO as Expected by. |
| Supplier Name *, Supplier GSTIN | As on a bill. Suppliers from your purchase bills are suggested. |
| Supplier Address (optional) | Printed on the PO. |
| PO number * | Filled in for you as PO/26-27/0001, counting up for each business and financial year. You can type your own. |
| Notes / terms (optional) | Delivery address, payment terms, packing. Printed on the PO under Notes / terms. |
| Cost centre | Only when cost centres are on. A bill made from the PO gets the same one. |
| Inter-state purchase | Tick for a supplier in another state: the PO shows IGST instead of CGST + SGST. |
The Items are the same as on a bill (see Items on the bill) with one more column, Unit (Nos, Kg, Box...), filled in from the product. There is no Payment Status and no round-off. Rows without a name or a quantity are left out when you save.
A number is never handed out twice. If you type a number already used by another PO, the message "... is already used by another purchase order" appears; change it.
"PO date is required", "Supplier name is required", "Add at least one item with a quantity": fill those in. "Could not get the next PO number. Type one in PO number.": the app could not reach its data for a moment; type a number yourself, or close and try again.
#Viewing and sending a purchase order
The eye opens Purchase order · PO number: the date, expected date, status and tax type, the supplier, the items with Unit, Taxable value, CGST and SGST or IGST, cess, TOTAL and your Notes / terms.
| Button | What it does |
|---|---|
| Close | Closes the window. |
| Duplicate | A new PO with the same supplier and items. |
| Edit | Open orders only. |
| On a phone that can share files, sends the PDF with a short message. On a computer, opens WhatsApp with the message (PO number, date, items, quantities, rates and total) for you to pick the supplier; attach the PDF yourself if you want it. | |
| Opens your email program with the subject Purchase order number and the order typed out. Add the supplier's email address, and attach the PDF from Download PDF if you want. | |
| Opens the PDF ready to print. If pop-ups are blocked, it downloads instead. | |
| Download PDF | Saves the PDF, named after the PO number with _ for each slash, such as PO_26-27_0001.pdf. |
| Convert to purchase bill | See Turning a purchase order into a bill. |
Received and cancelled orders show only Close and Duplicate.
The PDF is an A4 PURCHASE ORDER: your business name, address, state, GSTIN, phone and email at the top; the PO number, date and expected date; TO (SUPPLIER); the items; taxable value, CGST and SGST (or IGST), cess and TOTAL (INR) with the amount in words; your notes; and For your business with your signature image (from your business details or print settings) and Authorised signatory.
#Turning a purchase order into a bill
- Click ConvertClick the green Convert to purchase bill on the row, or the same button in the view.
- The bill form opensThe Add Purchase Bill form shows From purchase order PO number, with the supplier, the items still to come, their rates, GST and cost centre filled in. The date is today.
- Type the supplier's bill numberIn Invoice Number, from the bill that came with the goods. Set the Date to the date on their bill.
- Change quantitiesIf fewer came, change Qty to what actually came. Change a rate if the bill differs.
- SaveThe bill is saved, stock goes up, and the order becomes Partly received or Received.
When the rest comes, convert the same order again: only what is still to come is filled in. Deleting a bill made from an order takes the stock back out and puts the order back to Open or Partly received.
#"Not assigned to a business"
This only matters if you keep more than one business in the app. Records saved before you began keeping businesses separate have no business recorded, so they show under every business. Nothing is hidden, so nothing goes missing.
When there are any, a blue banner says, for example, 3 purchase bills are not assigned to a business, so they show under all of them. The same banner appears on Expenses, Recurring and Receipts, for their own records.
- Pick the right businessSwitch to the business those records belong to in the sidebar.
- AssignClick Assign to business name on the banner. A box asks you to confirm, naming the business.
- ConfirmClick Assign to business name again. The records now belong to that business only, and no longer show under the others. The banner goes away.
The button assigns all the unassigned records on that screen to the business selected. The app never guesses. If some belong to one business and some to another, do not use the button: open each one under the right business instead, or ask on the support page.
"Could not assign — please try again": the app could not save for a moment; click again. If it keeps happening, see Saving problems.